- Регистрация
- 9 Май 2015
- Сообщения
- 1,071
- Баллы
- 155
- Возраст
- 52
Last week, we released our latest , designed to be flexible and easy to use across various frameworks. To demonstrate its capabilities, we’ve built a comprehensive React demo that leverages both our SDK and to create a management application for your StellarDS project.
Since this demo covers a lot of ground, we’re splitting the blog post into two parts:
Since this demo contains a significant amount of source code, we won’t cover every single line in detail. Instead, we’ve provided the complete source code, which you can

In this blog post, we’ll focus on the core functionality of the application—how it works and how to integrate the StellarDS TypeScript SDK. We’ll skip the UI design aspects and other minor details, keeping the focus on the key implementation steps.
Prerequisites
Before getting started, make sure you have the following installed:
First, let’s create a new React project using TypeScript. Open your VSC terminal and run:
npx create-react-app my-project --template typescript
Once the setup is complete, navigate into your project folder:
cd my-project
Now, start your application:
npm start
At this point, you have a fully functional React application ready to integrate with the StellarDS SDK.
Installing Dependencies & Configuring the Environment
Now that our React project is set up, the next step is to install the necessary npm packages. Run the following command to install all required dependencies:
npm install @mui/material @emotion/react @emotion/styled ag-grid-react ag-grid-community stellards_typescript_sdk
The key dependencies here are:
Next, we need to set up environment variables for our project. Create a .env file in the root of your project and add the following:
REACT_APP_API_BASE_URL=
REACT_APP_PROJECT_ID= MYPROJECTID
REACT_APP_OAUTH_TOKEN= MYTOKEN
GENERATE_SOURCEMAP= false
These variables will allow us to dynamically configure API calls without hardcoding sensitive information in the codebase.
Loading Environment Variables in Code
To use these environment variables throughout our project, create a config.ts file inside the src directory and add the following code:
const config = {
apiBaseUrl: process.env.REACT_APP_API_BASE_URL,
projectId: process.env.REACT_APP_PROJECT_ID,
authToken: process.env.REACT_APP_OAUTH_TOKEN,
};
export default config;
Now, we can import config anywhere in our project whenever we need access to these environment variables.
Setting Up Routing
Now, let’s configure routing in our App.tsx file using react-router-dom while also wrapping our application with a ThemeProvider for consistent styling. Update the App function as follows
function App() {
return (
<ThemeProvider theme={theme}>
<div className="App">
<BrowserRouter>
{" "}
{/* Use BrowserRouter for routing */}
<div>
<Routes>
{" "}
<Route path="/" element={<TablesList />} />
<Route
path="/table/:tableId"
element={<TableComponent />}
/>
</Routes>
</div>
</BrowserRouter>
</div>
</ThemeProvider>
);
}
What This Does:
At this point, if TablesList and TableComponent haven't been created yet, they will show errors—you can ignore these for now.
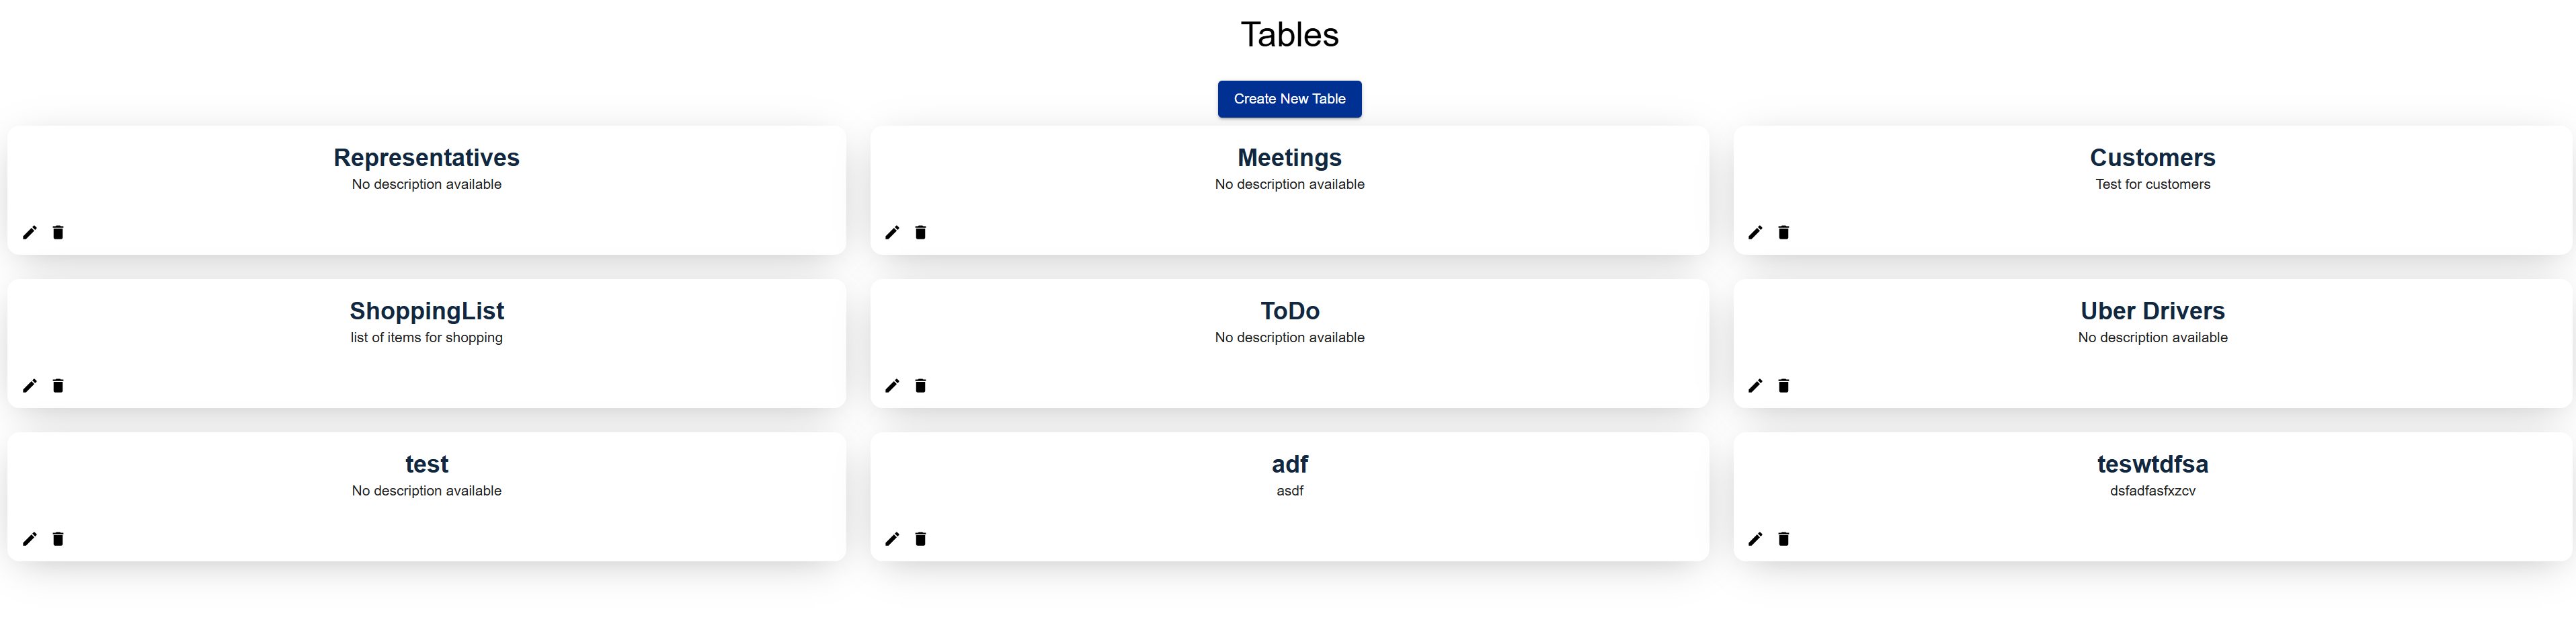
Showing a list of tables using a TableList Component
The TablesList component is responsible for displaying and managing tables in a StellarDS project. It leverages the TableService from the StellarDS TypeScript SDK to interact with the API, enabling users to fetch, create, update, and delete tables. Navigation is handled using React Router, while the UI is built with Material UI.
Using TableService from stellards_typescript_sdk
The StellarDS TypeScript SDK provides TableService, which simplifies interactions with the API. This service is instantiated using authentication and project details from the config.ts file.
import { TableService } from "stellards_typescript_sdk";
const tableService = new TableService(config.authToken ?? "", config.projectId ?? "");
With this service, the component can call methods like getTables(), createTable(), updateTable(), and deleteTable() to manage tables efficiently.
Fetching Tables
When the component loads, it fetches the list of tables using tableService.getTables(). This function is triggered inside a useEffect() hook, ensuring data updates when the project ID changes.
async function fetchTables() {
const response = await tableService.getTables(config.projectId ?? "");
setTables(response.data);
}
useEffect(() => {
if (config.projectId) fetchTables();
}, [config.projectId]);
Rendering Tables

Each table is displayed as a Material UI Card showing its name and description. Clicking on a card navigates the user to the table’s details page.
<Grid container spacing={3}>
{tables.map((table) => (
<Grid item xs={12} sm={6} md={4} key={table.id}>
<Card>
<CardContent onClick={() => navigate(`/table/${table.id}`)}>
<Typography variant="h5">{table.name}</Typography>
<Typography variant="body2">{table.description || "No description available"}</Typography>
</CardContent>
<CardActions>
<IconButton onClick={() => { setCurrentTable(table); setModalOpen(true); }}>
<EditIcon />
</IconButton>
<IconButton onClick={() => handleDeleteTable(table.id)}>
<DeleteIcon />
</IconButton>
</CardActions>
</Card>
</Grid>
))}
</Grid>
Creating and Updating Tables
Users can create a new table by clicking the "Create New Table" button, which opens a modal. Similarly, clicking the edit button on a table opens an update modal.
<Button variant="contained" onClick={() => setCreateModalOpen(true)}>
Create New Table
</Button>
<CreateTableModal open={createModalOpen} onClose={() => setCreateModalOpen(false)} onCreate={handleCreateNewTable} />
{currentTable && (
<UpdateTableModal
open={modalOpen}
handleClose={() => setModalOpen(false)}
handleUpdate={handleUpdateTable}
table={currentTable}
/>
)}
Handling Table Actions with TableService
The TableService methods allow seamless CRUD operations.
Creating a Table
const handleCreateNewTable = async (tableData: any) => {
await tableService.createTable(config.projectId ?? "", tableData);
fetchTables();
setCreateModalOpen(false);
};
Updating a Table
const handleUpdateTable = async (tableData: any) => {
await tableService.updateTable(config.projectId ?? "", tableData.id, tableData);
fetchTables();
setModalOpen(false);
};
Deleting a Table
const handleDeleteTable = async (tableId: string) => {
if (window.confirm("Are you sure you want to delete this table?")) {
await tableService.deleteTable(config.projectId ?? "", tableId);
fetchTables();
}
};
This demo showcases how to effectively manage tables within a StellarDS project using the StellarDS TypeScript SDK. We've built a React-based interface that allows users to view, create, update, and delete tables, all while leveraging Material UI for styling and React Router for seamless navigation.
So far, we've laid the groundwork by setting up the project, integrating the SDK, and implementing table management functionality. In Part Two, we’ll take this further by adding AG Grid for enhanced table visualization and implementing CRUD operations to provide a more dynamic and interactive experience.
Get Started Today
The StellarDS Typescript SDK is available now, complete with sample code and detailed documentation to help you hit the ground running. Explore our to-do list demo, dive into the SDK’s capabilities, and start building powerful applications with StellarDS today.
or to get started now!
Follow us now!
Show us support and follow us on our social media to always be up to date about
Since this demo covers a lot of ground, we’re splitting the blog post into two parts:
- Part 1 (This post): Setting up the React project, installing dependencies, and using the SDK to create components and modals for managing your project and tables.
- Part 2 (Coming next week): Integrating AG Grid, performing CRUD operations on tables, customizing the interface, and running the complete project.
Since this demo contains a significant amount of source code, we won’t cover every single line in detail. Instead, we’ve provided the complete source code, which you can
In this blog post, we’ll focus on the core functionality of the application—how it works and how to integrate the StellarDS TypeScript SDK. We’ll skip the UI design aspects and other minor details, keeping the focus on the key implementation steps.
Prerequisites
Before getting started, make sure you have the following installed:
- (v6 or higher) or
- An IDE of your choice (we use )
First, let’s create a new React project using TypeScript. Open your VSC terminal and run:
npx create-react-app my-project --template typescript
Once the setup is complete, navigate into your project folder:
cd my-project
Now, start your application:
npm start
At this point, you have a fully functional React application ready to integrate with the StellarDS SDK.
Installing Dependencies & Configuring the Environment
Now that our React project is set up, the next step is to install the necessary npm packages. Run the following command to install all required dependencies:
npm install @mui/material @emotion/react @emotion/styled ag-grid-react ag-grid-community stellards_typescript_sdk
The key dependencies here are:
- stellards_typescript_sdk – Our SDK for interacting with StellarDS.
- ag-grid-react & ag-grid-community – Used to create and manage data grids.
- Material UI (@mui/material, @emotion/react, @emotion/styled) – For styling components.
Next, we need to set up environment variables for our project. Create a .env file in the root of your project and add the following:
REACT_APP_API_BASE_URL=
REACT_APP_PROJECT_ID= MYPROJECTID
REACT_APP_OAUTH_TOKEN= MYTOKEN
GENERATE_SOURCEMAP= false
These variables will allow us to dynamically configure API calls without hardcoding sensitive information in the codebase.
Loading Environment Variables in Code
To use these environment variables throughout our project, create a config.ts file inside the src directory and add the following code:
const config = {
apiBaseUrl: process.env.REACT_APP_API_BASE_URL,
projectId: process.env.REACT_APP_PROJECT_ID,
authToken: process.env.REACT_APP_OAUTH_TOKEN,
};
export default config;
Now, we can import config anywhere in our project whenever we need access to these environment variables.
Setting Up Routing
Now, let’s configure routing in our App.tsx file using react-router-dom while also wrapping our application with a ThemeProvider for consistent styling. Update the App function as follows
function App() {
return (
<ThemeProvider theme={theme}>
<div className="App">
<BrowserRouter>
{" "}
{/* Use BrowserRouter for routing */}
<div>
<Routes>
{" "}
<Route path="/" element={<TablesList />} />
<Route
path="/table/:tableId"
element={<TableComponent />}
/>
</Routes>
</div>
</BrowserRouter>
</div>
</ThemeProvider>
);
}
What This Does:
- Wraps the entire app inside ThemeProvider, allowing us to apply a global theme.
- Uses BrowserRouter to enable client-side routing.
- Defines two routes:
- / �' Loads the TablesList component.
- /table/:tableId �' Dynamically loads the TableComponent based on the tableId parameter.
At this point, if TablesList and TableComponent haven't been created yet, they will show errors—you can ignore these for now.
Showing a list of tables using a TableList Component
The TablesList component is responsible for displaying and managing tables in a StellarDS project. It leverages the TableService from the StellarDS TypeScript SDK to interact with the API, enabling users to fetch, create, update, and delete tables. Navigation is handled using React Router, while the UI is built with Material UI.
Using TableService from stellards_typescript_sdk
The StellarDS TypeScript SDK provides TableService, which simplifies interactions with the API. This service is instantiated using authentication and project details from the config.ts file.
import { TableService } from "stellards_typescript_sdk";
const tableService = new TableService(config.authToken ?? "", config.projectId ?? "");
With this service, the component can call methods like getTables(), createTable(), updateTable(), and deleteTable() to manage tables efficiently.
Fetching Tables
When the component loads, it fetches the list of tables using tableService.getTables(). This function is triggered inside a useEffect() hook, ensuring data updates when the project ID changes.
async function fetchTables() {
const response = await tableService.getTables(config.projectId ?? "");
setTables(response.data);
}
useEffect(() => {
if (config.projectId) fetchTables();
}, [config.projectId]);
Rendering Tables
Each table is displayed as a Material UI Card showing its name and description. Clicking on a card navigates the user to the table’s details page.
<Grid container spacing={3}>
{tables.map((table) => (
<Grid item xs={12} sm={6} md={4} key={table.id}>
<Card>
<CardContent onClick={() => navigate(`/table/${table.id}`)}>
<Typography variant="h5">{table.name}</Typography>
<Typography variant="body2">{table.description || "No description available"}</Typography>
</CardContent>
<CardActions>
<IconButton onClick={() => { setCurrentTable(table); setModalOpen(true); }}>
<EditIcon />
</IconButton>
<IconButton onClick={() => handleDeleteTable(table.id)}>
<DeleteIcon />
</IconButton>
</CardActions>
</Card>
</Grid>
))}
</Grid>
Creating and Updating Tables
Users can create a new table by clicking the "Create New Table" button, which opens a modal. Similarly, clicking the edit button on a table opens an update modal.
<Button variant="contained" onClick={() => setCreateModalOpen(true)}>
Create New Table
</Button>
<CreateTableModal open={createModalOpen} onClose={() => setCreateModalOpen(false)} onCreate={handleCreateNewTable} />
{currentTable && (
<UpdateTableModal
open={modalOpen}
handleClose={() => setModalOpen(false)}
handleUpdate={handleUpdateTable}
table={currentTable}
/>
)}
Handling Table Actions with TableService
The TableService methods allow seamless CRUD operations.
Creating a Table
const handleCreateNewTable = async (tableData: any) => {
await tableService.createTable(config.projectId ?? "", tableData);
fetchTables();
setCreateModalOpen(false);
};
Updating a Table
const handleUpdateTable = async (tableData: any) => {
await tableService.updateTable(config.projectId ?? "", tableData.id, tableData);
fetchTables();
setModalOpen(false);
};
Deleting a Table
const handleDeleteTable = async (tableId: string) => {
if (window.confirm("Are you sure you want to delete this table?")) {
await tableService.deleteTable(config.projectId ?? "", tableId);
fetchTables();
}
};
This demo showcases how to effectively manage tables within a StellarDS project using the StellarDS TypeScript SDK. We've built a React-based interface that allows users to view, create, update, and delete tables, all while leveraging Material UI for styling and React Router for seamless navigation.
So far, we've laid the groundwork by setting up the project, integrating the SDK, and implementing table management functionality. In Part Two, we’ll take this further by adding AG Grid for enhanced table visualization and implementing CRUD operations to provide a more dynamic and interactive experience.
Get Started Today
The StellarDS Typescript SDK is available now, complete with sample code and detailed documentation to help you hit the ground running. Explore our to-do list demo, dive into the SDK’s capabilities, and start building powerful applications with StellarDS today.
or to get started now!
Follow us now!
Show us support and follow us on our social media to always be up to date about