- Регистрация
- 9 Май 2015
- Сообщения
- 1,071
- Баллы
- 155
- Возраст
- 52
In Part One, we laid the foundation for our management application by setting up a React project, installing the necessary dependencies, and using the to manage tables. We built a TableList component that allows users to create, update, and delete tables while leveraging Material UI for styling and React Router for navigation.

Now, in Part Two, we’ll take things to the next level by integrating for an enhanced, interactive table experience. AG Grid provides powerful features such as inline editing, sorting, and dynamic column rendering—perfect for working with structured data.
We’ll also implement CRUD operations using the TableService from the StellarDS SDK, enabling users to interact with table records in real-time. By the end of this post, our application will support:
Let’s dive into building a fully functional table management interface that seamlessly integrates AG Grid with the StellarDS SDK!
Demo
Since this demo contains a significant amount of source code, we won’t cover every single line in detail. Instead, we’ve provided the complete source code, which you can . This demo is included with the source code of the SDK on GitHub

In this blog post, we’ll focus on the core functionality of the application—how it works and how to integrate the StellarDS TypeScript SDK. We’ll skip the UI design aspects and other minor details, keeping the focus on the key implementation steps.
Creating our Records view using the TableComponent
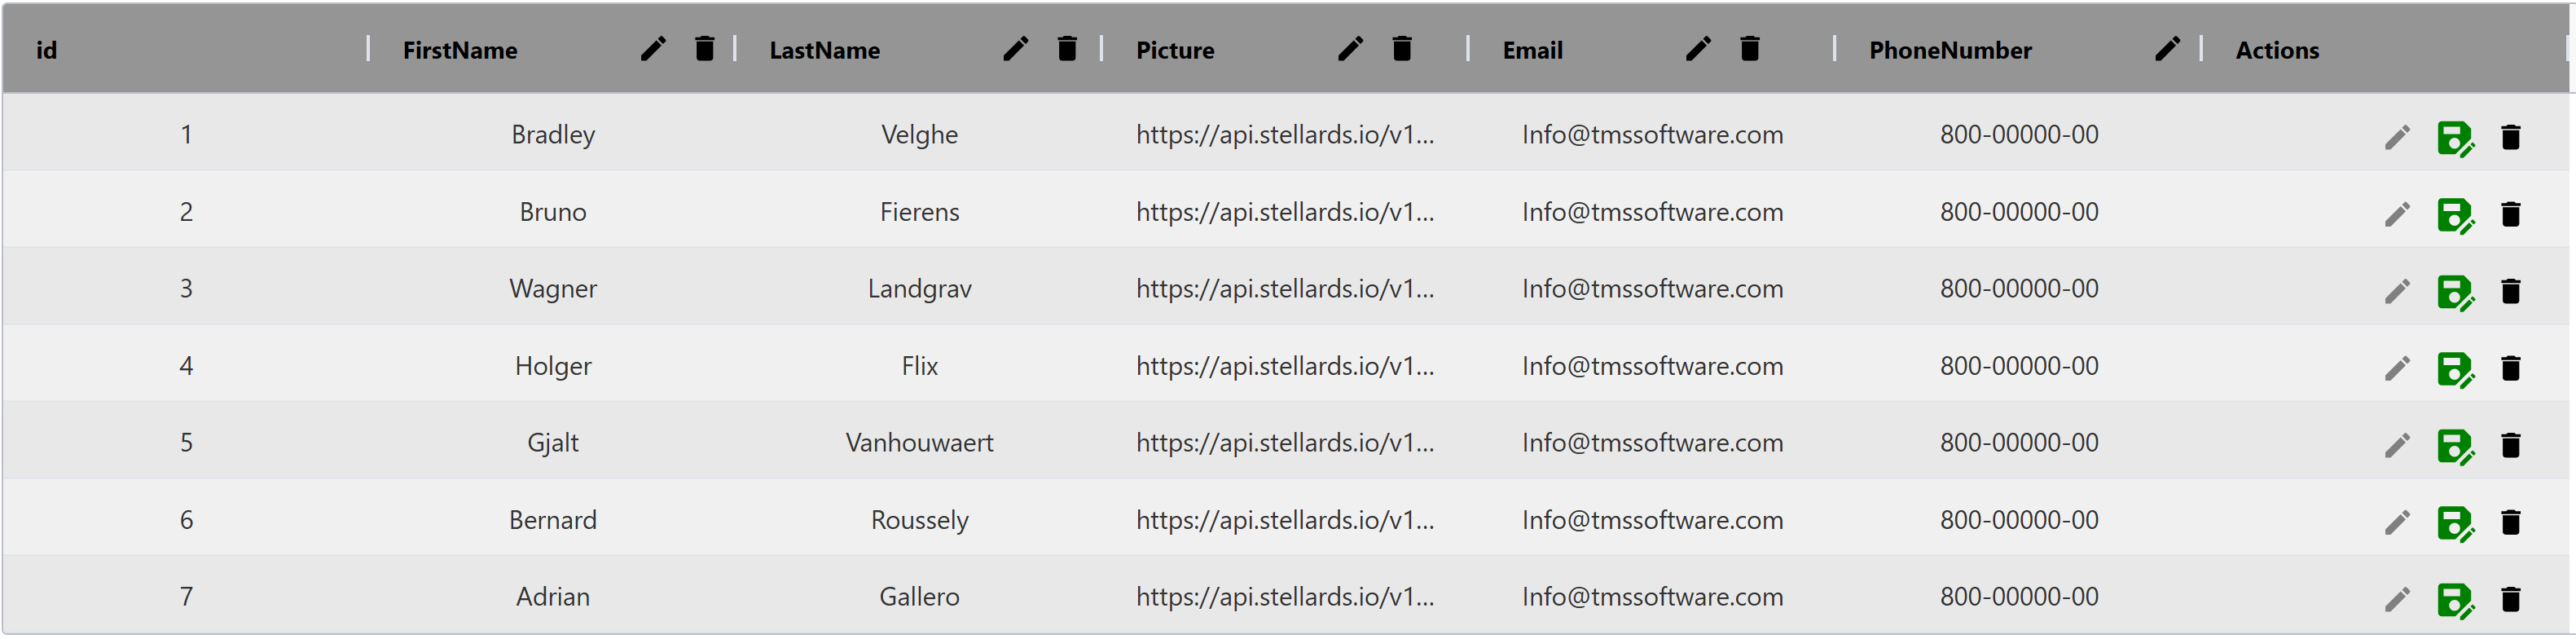
his component is responsible for rendering and managing a table dynamically. When loaded, it fetches the table's structure and data from the backend. Users can then edit values directly in the table, add new records, modify the schema by adding new fields, or delete existing records.
The table itself is built using ag-grid-react, which provides a robust and customizable data grid. Meanwhile, all backend interactions—such as retrieving records, updating them, and managing the schema—are handled through TableService from stellards_typescript_sdk.
At a high level, here’s what happens inside the component:
Now, let's break down how these functionalities are implemented.
Using ag-Grid to Display and Edit Data
The core of our component is ag-grid-react, which is responsible for rendering the data grid. The AgGridReact component is configured with the rowData (which contains the actual records) and columnDefs (which define the table structure).
<AgGridReact
rowData={rowData}
columnDefs={columnDefs}
domLayout="autoHeight"
getRowStyle={getRowStyle}
onCellValueChanged={(event) => {
if (editingRowId === event.data.id) {
saveChanges(event.data);
}
}}
/>
Each row corresponds to a record, and users can modify values directly in the table. The onCellValueChanged handler ensures that changes are saved when a cell is updated.
To define the table structure dynamically, we first fetch the fields using TableService. Each field retrieved from the backend is mapped to a column definition that specifies whether it's editable and how it should be displayed.
const fetchTableFields = async () => {
try {
const fields = await tableService.getTableFields(config.projectId ?? "", Number(tableId));
const columns = fields.map((field: any) => ({
headerName: field.name,
field: field.name,
editable: true,
cellEditor: "agTextCellEditor",
headerComponent: CustomHeader,
headerComponentParams: {
data: field,
onUpdate: handleUpdateFieldClick,
onDelete: handleDeleteField,
},
}));
columns.push({
headerName: "Actions",
cellRenderer: ActionButtons,
cellRendererParams: {
onUpdate: handleUpdateRecordPrompt,
onDelete: handleDeleteRecord,
},
});
setColumnDefs(columns);
} catch (error) {
console.error("Error fetching table fields:", error);
}
};
This function retrieves the table structure, creates column definitions for each field, and adds an extra Actions column, which contains buttons for updating or deleting records.
Styling Rows Based on Editing State
To visually indicate when a row is being edited, we apply conditional styling. The getRowStyle function checks if the row corresponds to the currently edited record and highlights it accordingly.
const getRowStyle = (params: any) => {
if (params.node.data.id === editingRowId) {
return { backgroundColor: "orange", color: "white" };
} else {
return {};
}
};
This improves the user experience by clearly marking which row is actively being modified.

Using TableService for Backend Interaction
To manage records and schema dynamically, we use TableService from stellards_typescript_sdk. This service provides methods for fetching table data, updating records, and modifying the schema.
We initialize TableService as follows:
const tableService = useMemo(() => {
return new TableService(config.authToken ?? "", config.projectId ?? "");
}, []);
This ensures that the service is instantiated once and reused throughout the component.
Fetching Table Data
When the component loads, it fetches the existing records from the backend and updates the table state.
const fetchTableData = useCallback(async () => {
try {
const response = await tableService.getTableData(config.projectId ?? "", Number(tableId));
setRowData(response.data);
} catch (error) {
console.error("Error fetching table data:", error);
}
}, [config.projectId, tableId, tableService]);
Adding a New Record
Users can add new records by providing the required data. This function sends the new record to the backend and refreshes the table.
const handleAddRecord = async (newRecord: any) => {
try {
await tableService.addRecords(config.projectId ?? "", tableId ?? "", [newRecord]);
fetchTableData();
alert("Record added successfully");
} catch (error) {
console.error("Error adding record:", error);
}
};
Updating a Record
Edits can be made either directly in the table or through a prompt that allows users to modify the record in JSON format.
const handleUpdateRecordPrompt = async (currentData: any) => {
const updatedDataString = prompt(
"Update record data in JSON format:",
JSON.stringify(currentData)
);
if (updatedDataString) {
const updatedData = JSON.parse(updatedDataString);
const idList = [currentData.id];
await tableService.updateRecords(config.projectId ?? "", Number(tableId), idList, [updatedData]);
fetchTableData();
}
};
Alternatively, if a user edits a cell in ag-Grid, the changes are saved automatically.
const saveChanges = async (data: any) => {
try {
const idList = [data.id];
await tableService.updateRecords(config.projectId ?? "", Number(tableId), idList, data);
setEditingRowId(null);
fetchTableData();
} catch (error) {
console.error("Error updating record:", error);
}
};
Deleting Records
Users can delete a single record or clear all records from the table.
const handleDeleteRecord = async (recordId: number) => {
if (window.confirm("Are you sure you want to delete this record?")) {
await tableService.deleteRecords(config.projectId ?? "", Number(tableId), recordId);
fetchTableData();
}
};
To remove all records at once, we use:
const handleDeleteAllRecord = async () => {
if (window.confirm("Are you sure you want to delete all records?")) {
await tableService.clearTable(config.projectId ?? "", Number(tableId));
fetchTableData();
}
};
With AG Grid successfully integrated, our StellarDS management application is now fully functional! We've built a dynamic and interactive interface that allows users to view, edit, create, and delete table records using the StellarDS TypeScript SDK. AG Grid’s powerful features—like inline editing, sorting, and real-time updates—enhance the user experience, making it easy to manage data efficiently.

This marks the end of our two-part blog series, where we started from setting up the React project and integrating the StellarDS SDK in Part One, to implementing AG Grid and CRUD operations in Part Two. The final result is a comprehensive table management demo that showcases how StellarDS can be seamlessly used with modern frontend frameworks.
We hope this guide helps you get started with StellarDS, AG Grid, and React. If you want to explore further, check out the full source code and feel free to experiment with additional customizations.
Get Started Today
The StellarDS Typescript SDK is available now, complete with sample code and detailed documentation to help you hit the ground running. Explore our to-do list demo, dive into the SDK’s capabilities, and start building powerful applications with StellarDS today.
or to get started now!
Follow us now!
Show us support and follow us on our social media to always be up to date about
Now, in Part Two, we’ll take things to the next level by integrating for an enhanced, interactive table experience. AG Grid provides powerful features such as inline editing, sorting, and dynamic column rendering—perfect for working with structured data.
We’ll also implement CRUD operations using the TableService from the StellarDS SDK, enabling users to interact with table records in real-time. By the end of this post, our application will support:
- Fetching table data dynamically
- Editing records directly in the grid
- Adding and deleting records
- Modifying the table schema
Let’s dive into building a fully functional table management interface that seamlessly integrates AG Grid with the StellarDS SDK!
Demo
Since this demo contains a significant amount of source code, we won’t cover every single line in detail. Instead, we’ve provided the complete source code, which you can . This demo is included with the source code of the SDK on GitHub
In this blog post, we’ll focus on the core functionality of the application—how it works and how to integrate the StellarDS TypeScript SDK. We’ll skip the UI design aspects and other minor details, keeping the focus on the key implementation steps.
Creating our Records view using the TableComponent
his component is responsible for rendering and managing a table dynamically. When loaded, it fetches the table's structure and data from the backend. Users can then edit values directly in the table, add new records, modify the schema by adding new fields, or delete existing records.
The table itself is built using ag-grid-react, which provides a robust and customizable data grid. Meanwhile, all backend interactions—such as retrieving records, updating them, and managing the schema—are handled through TableService from stellards_typescript_sdk.
At a high level, here’s what happens inside the component:
- The table structure (fields) is fetched from the backend and used to define the column headers.
- The actual table data (records) is retrieved and displayed in ag-grid-react.
- Users can edit values, and changes are automatically saved.
- Custom modals allow users to add new fields or records.
- Actions like deleting individual records or clearing the entire table are supported.
Now, let's break down how these functionalities are implemented.
Using ag-Grid to Display and Edit Data
The core of our component is ag-grid-react, which is responsible for rendering the data grid. The AgGridReact component is configured with the rowData (which contains the actual records) and columnDefs (which define the table structure).
<AgGridReact
rowData={rowData}
columnDefs={columnDefs}
domLayout="autoHeight"
getRowStyle={getRowStyle}
onCellValueChanged={(event) => {
if (editingRowId === event.data.id) {
saveChanges(event.data);
}
}}
/>
Each row corresponds to a record, and users can modify values directly in the table. The onCellValueChanged handler ensures that changes are saved when a cell is updated.
To define the table structure dynamically, we first fetch the fields using TableService. Each field retrieved from the backend is mapped to a column definition that specifies whether it's editable and how it should be displayed.
const fetchTableFields = async () => {
try {
const fields = await tableService.getTableFields(config.projectId ?? "", Number(tableId));
const columns = fields.map((field: any) => ({
headerName: field.name,
field: field.name,
editable: true,
cellEditor: "agTextCellEditor",
headerComponent: CustomHeader,
headerComponentParams: {
data: field,
onUpdate: handleUpdateFieldClick,
onDelete: handleDeleteField,
},
}));
columns.push({
headerName: "Actions",
cellRenderer: ActionButtons,
cellRendererParams: {
onUpdate: handleUpdateRecordPrompt,
onDelete: handleDeleteRecord,
},
});
setColumnDefs(columns);
} catch (error) {
console.error("Error fetching table fields:", error);
}
};
This function retrieves the table structure, creates column definitions for each field, and adds an extra Actions column, which contains buttons for updating or deleting records.
Styling Rows Based on Editing State
To visually indicate when a row is being edited, we apply conditional styling. The getRowStyle function checks if the row corresponds to the currently edited record and highlights it accordingly.
const getRowStyle = (params: any) => {
if (params.node.data.id === editingRowId) {
return { backgroundColor: "orange", color: "white" };
} else {
return {};
}
};
This improves the user experience by clearly marking which row is actively being modified.
Using TableService for Backend Interaction
To manage records and schema dynamically, we use TableService from stellards_typescript_sdk. This service provides methods for fetching table data, updating records, and modifying the schema.
We initialize TableService as follows:
const tableService = useMemo(() => {
return new TableService(config.authToken ?? "", config.projectId ?? "");
}, []);
This ensures that the service is instantiated once and reused throughout the component.
Fetching Table Data
When the component loads, it fetches the existing records from the backend and updates the table state.
const fetchTableData = useCallback(async () => {
try {
const response = await tableService.getTableData(config.projectId ?? "", Number(tableId));
setRowData(response.data);
} catch (error) {
console.error("Error fetching table data:", error);
}
}, [config.projectId, tableId, tableService]);
Adding a New Record
Users can add new records by providing the required data. This function sends the new record to the backend and refreshes the table.
const handleAddRecord = async (newRecord: any) => {
try {
await tableService.addRecords(config.projectId ?? "", tableId ?? "", [newRecord]);
fetchTableData();
alert("Record added successfully");
} catch (error) {
console.error("Error adding record:", error);
}
};
Updating a Record
Edits can be made either directly in the table or through a prompt that allows users to modify the record in JSON format.
const handleUpdateRecordPrompt = async (currentData: any) => {
const updatedDataString = prompt(
"Update record data in JSON format:",
JSON.stringify(currentData)
);
if (updatedDataString) {
const updatedData = JSON.parse(updatedDataString);
const idList = [currentData.id];
await tableService.updateRecords(config.projectId ?? "", Number(tableId), idList, [updatedData]);
fetchTableData();
}
};
Alternatively, if a user edits a cell in ag-Grid, the changes are saved automatically.
const saveChanges = async (data: any) => {
try {
const idList = [data.id];
await tableService.updateRecords(config.projectId ?? "", Number(tableId), idList, data);
setEditingRowId(null);
fetchTableData();
} catch (error) {
console.error("Error updating record:", error);
}
};
Deleting Records
Users can delete a single record or clear all records from the table.
const handleDeleteRecord = async (recordId: number) => {
if (window.confirm("Are you sure you want to delete this record?")) {
await tableService.deleteRecords(config.projectId ?? "", Number(tableId), recordId);
fetchTableData();
}
};
To remove all records at once, we use:
const handleDeleteAllRecord = async () => {
if (window.confirm("Are you sure you want to delete all records?")) {
await tableService.clearTable(config.projectId ?? "", Number(tableId));
fetchTableData();
}
};
With AG Grid successfully integrated, our StellarDS management application is now fully functional! We've built a dynamic and interactive interface that allows users to view, edit, create, and delete table records using the StellarDS TypeScript SDK. AG Grid’s powerful features—like inline editing, sorting, and real-time updates—enhance the user experience, making it easy to manage data efficiently.
This marks the end of our two-part blog series, where we started from setting up the React project and integrating the StellarDS SDK in Part One, to implementing AG Grid and CRUD operations in Part Two. The final result is a comprehensive table management demo that showcases how StellarDS can be seamlessly used with modern frontend frameworks.
We hope this guide helps you get started with StellarDS, AG Grid, and React. If you want to explore further, check out the full source code and feel free to experiment with additional customizations.
Get Started Today
The StellarDS Typescript SDK is available now, complete with sample code and detailed documentation to help you hit the ground running. Explore our to-do list demo, dive into the SDK’s capabilities, and start building powerful applications with StellarDS today.
or to get started now!
Follow us now!
Show us support and follow us on our social media to always be up to date about